If you spend more than 4 hours a day at a desk, your workstation setup is silently shaping your health — for better or worse.
The good news? You don’t need an expensive office renovation. With a few strategic adjustments — many of them free — you can build a workspace that protects your spine, reduces fatigue, and even helps you focus better.
This is the complete guide you’ve been looking for.
Why Your Current Setup Is Probably Hurting You
Studies show that over 80% of desk workers experience musculoskeletal pain annually. The culprit is almost never the hours themselves — it’s the posture those hours create.
Common problems and their causes:
- Lower back pain → Unsupported lumbar region, incorrect chair height
- Neck & shoulder tension → Monitor too low or too far away
- Wrist pain / carpal tunnel → Keyboard at the wrong angle, no wrist rest
- Eye strain & headaches → Screen glare, incorrect monitor distance
The solution is a properly calibrated ergonomic setup. Here’s exactly how to build one.
Step 1: Start With Your Chair Height
Your chair is the foundation of everything. Get this wrong and every other adjustment is a band-aid.
The rule: When seated, your feet should be flat on the floor (or a footrest), your knees at 90°, and your thighs parallel to the ground.
Checklist:
- ✅ Feet flat on the floor
- ✅ Knees at 90° angle (or slightly obtuse)
- ✅ Thighs not compressed by the seat edge
- ✅ Hips slightly higher than knees (promotes lumbar curve)
Pro tip: If your chair seat is too firm or offers little coccyx support, consider an ergonomic office chair cushion — it redistributes pressure away from your sit bones, dramatically reducing lower back strain during long sessions.
Step 2: Lumbar Support Is Non-Negotiable
Your lumbar spine has a natural inward curve. Sitting without support flattens that curve, putting up to 8x more pressure on your discs than standing.
Ideal lumbar setup:
- Backrest reclined slightly (100–110°, not 90°)
- Lumbar support pad positioned at the small of your back (around belt level)
- Armrests adjusted so shoulders can relax completely
If your chair lacks built-in lumbar support, a lumbar pillow or a quality posture correcting seat pad can bridge the gap effectively.
Step 3: Monitor Height & Distance
This is the #1 mistake desk workers make. The monitor is almost always too low.
The formula:
- Height: The top of your monitor should be at (or slightly below) eye level
- Distance: 20–30 inches away — roughly arm’s length
- Tilt: Angle the monitor back 10–20° from vertical
Why it matters: Every inch your head drops below neutral posture adds approximately 10 lbs of effective load on your cervical spine.
A monitor arm is one of the best investments in your ergonomic setup — it lets you dial in exact position and frees up valuable desk space.
Step 4: Keyboard & Mouse Placement
Your keyboard and mouse should allow you to type with:
- Elbows at 90° and close to your body
- Wrists neutral (not bent up or down)
- Mouse close to keyboard — no reaching
Keyboard setup:
- If you use a keyboard tray, angle it slightly negative (away from you)
- On desk surface: keep it at elbow height
- Use a wrist rest for pauses only, not while actively typing
Step 5: Lighting — Often Overlooked, Always Important
Blue-light fatigue is real. But more often, glare is the hidden cause of headaches and eye strain.
Fix your lighting:
- Position your monitor perpendicular to windows (not facing toward or away from them)
- Use a desk lamp with warm, indirect light for ambient fill
- Enable Night Mode/True Tone on your monitor
- Follow the 20-20-20 rule: every 20 minutes, look at something 20 feet away for 20 seconds
Step 6: The Optimal Desk Height
If you don’t have a height-adjustable desk, this step defines whether you adapt your body to your desk (bad) or your desk to your body (good).
The ideal desk height puts your keyboard at elbow height when you’re seated correctly. For most people, that’s 26–28 inches sitting.
Pro tip: If you want to add a standing component without buying a new desk, a desktop riser is a cost-effective option. Start with a standing desk vs sitting desk comparison to understand if a full desk switch makes sense for you.
Step 7: Organize Your Work Zone
Clutter isn’t just aesthetic — it forces bad micro-postures (reaching, twisting, craning).
Your ergonomic desk zone:
- Primary zone (within 1 arm reach): Monitor, keyboard, mouse, phone
- Secondary zone (within 2 arm reach): Notepad, documents you reference regularly
- Tertiary zone (stand to reach): Archive, printer, supplies
Cable management also prevents accidental pulling on your posture. Use cable clips or a cable tray under the desk.
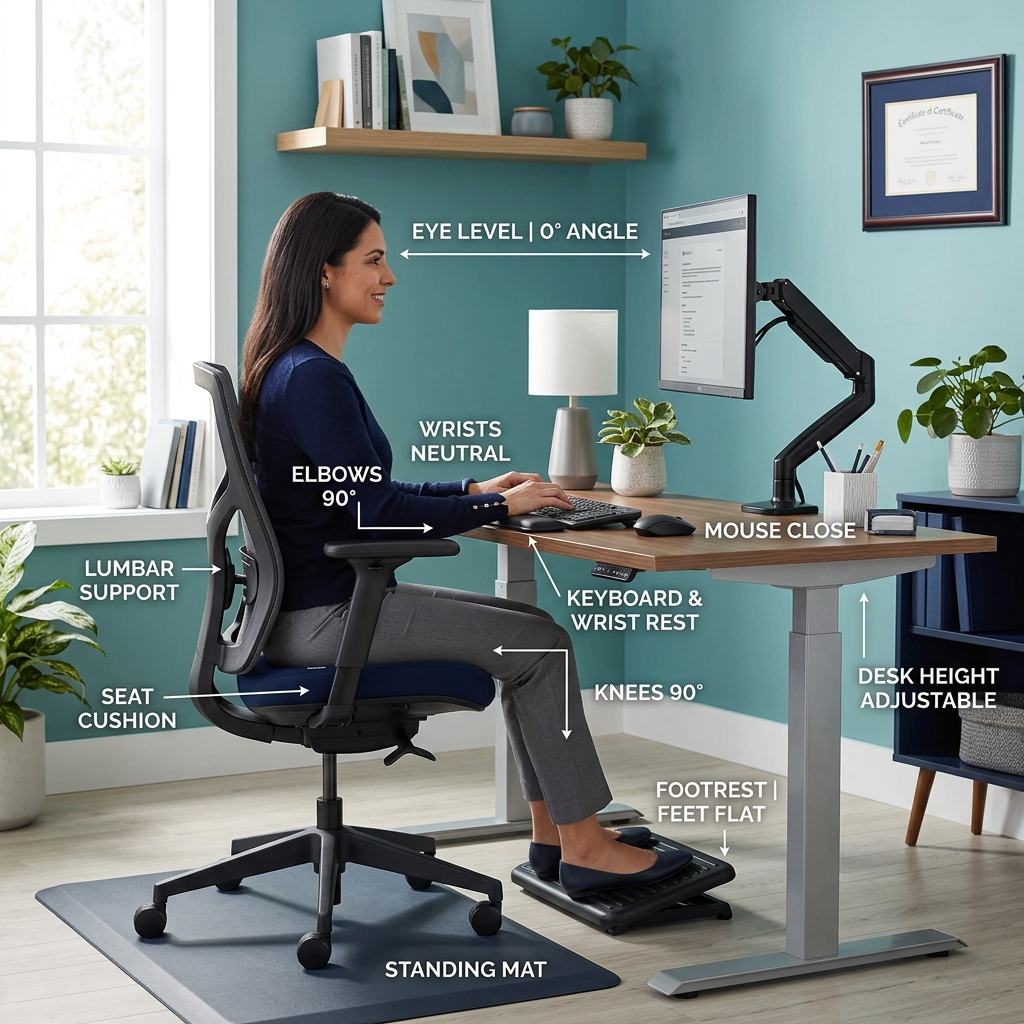
The Complete Ergonomic Desk Setup Checklist
Print this and keep it at your desk:
- Chair height: feet flat, knees 90°
- Lumbar support at belt level
- Monitor top at eye level, arm’s length away
- Keyboard at elbow height, wrists neutral
- Mouse close to keyboard
- Screen perpendicular to window
- Primary items within arm’s reach
- Seat cushion or padding for comfort
Common Ergonomic Setup Mistakes to Avoid
| Mistake | Impact | Fix |
|---|---|---|
| Monitor too low | Neck flexion, headaches | Use monitor arm or stand |
| Chair too high | Shoulders raised, tension | Adjust to elbow height |
| Laptop-only setup | Constant neck drop | Add external monitor |
| No wrist rest | Carpal tunnel risk | Add wrist pad or pressure relief cushion |
| Ignoring seat comfort | Tailbone/hip pain | Use seat cushion |
Ready to Build Your Setup?
Start with what you can control today: chair height, monitor position, and lumbar support. These three changes alone will produce a noticeable difference within a week.
For deeper guides on specific components, explore: